Saturday, December 14, 2013

Transmission Line Analysis Using Matlab

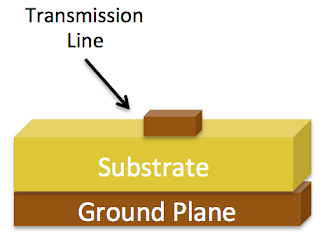
Matlab has a Radio Frequency Toolbox(rf toolbox). Using this toolbox matlab allows us to do some simulation and calculations about transmission lines, active components, RLC components, black box elements etc. In this post we are going to analyze a microstripline using 'rfckt.microstrip' class in the matlab.


Let's calculate characteristic impedance of a microstrip line at 1Ghz, 2Ghz and 3Ghz with the given specifications below:

thickness = 5.000e-09
width = 4.000e-04
height = 3.000e-04

To do the given task we can write the following m file and execute it. The output of the matlab is given below the codes.


% written by Mustafa DEMİR - eeecoder@gmail.com
%Dec 14, 2013 

mstrpline = rfckt.microstrip('Thickness',5.000e-09,'Width',4.000e-04,'Height',3.000e-04);

analyze(mstrpline,[1e9 2e9 3e9]);
mstrpline.AnalyzedResult
getz0(mstrpline)

Matlab Command Window Output:


Read More

Thursday, November 7, 2013

USB Not Working on Virtualbox (on Linux host)

When using Virtualbox, generally we have usb problem. It doesn't work at the begining. The reason of that situation is the users of virtualbox operating systems doesn't know the host user. (in this case host is any Linux distribution)

To deal with this problem we need to add host  user to the 'vboxusers'(virtualbox users g.) group. Proceed the following steps:

1. Open a terminal
2. Enter the following code.

sudo usermod -a -G vboxusers username

where username is the user you want to add.

3. After you do that all you need to do is open Virtualbox and select Devices > USB > "Whatever usb device you want to add"

Read More

Delta Modulation Encoder and Decoder

In Delta Modulation, the quantizer is a 1-bit (two level) quantizer with magnitudes +δ and -δ . A block diagram of a delta modulation system is shown in following figure. Delta modulation transmits only one bit per sample. As seen from block diagram, the present value is compared with the previous value and according to sign of this difference the staircase approximated signal is whether decreased by δ or incread by δ. δ is called step size. By this operation the input signal is approximated with a staircase signal. After this to indicate this decreses or increses a zero is send for decresing by δ and a one is send for increasing by δ.


Advantages of Delta Modulation

The delta modulation has the following advantages over PCM:

1. Delta modulation transmits only one bit.
2. The transmitter and receiver is very simple to implement.

Disadvantages of Delta Modulation

The following are the disadvantages of delta modulation:
1. Granular Noise.
2. Over-slope noise distortion.


Delta Modulator Encoder and Decoder Implementation and Analysis

I implemented delta modulator encoder and decoder using matlab. My matlab codes and results are given in the below.

Note: The required comments are given within the code.


clc             % clear command window
clear all       % clear variables
close all       % close all opened figures
 
t=[0:0.01:1]    % time matrix
m=sinc(2*pi*t)  % the original signal firstly we tried with sinc function
subplot(3,1,1)  % to plot following 3 figures in one window
hold on         % plot on this figure  


plot(m,'*black')            % plotting the original signal 
title('sinc function')      % title of first figure as 'sinc function' 
xlabel('time')              % x axes label as time
ylabel('amplitude')         % y axes label as amplitude
d=2*pi/100                  % step size as d = 2*pi/100;
for n=1:1:100               % taking 100 samples
if n==1                     % if n is equal 1 do the followings.
e(n)=m(n)                   
eq(n)=d*sign(e(n))
mq(n)=0;                    % we give its initial value as zero. 
else                        % if n is not equal one do the followins.
e(n)=m(n)-mq(n-1)           % compare the present value of original signal with the previous value of quantized signal
eq(n)=d*sign(e(n))          % multiply with d and sign of difference.
mq(n)=mq(n-1)+eq(n)         % add this to the previous value of quantized signal to find the present value of it.
end                         % finish the inner loop
 
end                         % finish the outer loop
 
 
enData = [0];               % encoded data initial value is zero. 
enData(1) = mq(1);          % encoded data first value is equal fist value of quantized signal. 
 
%%%% In this part we control the quantized values whether its increases or
%%%% decreses and we set logic 1 for increased values, we set logic 0 for
%%%% decreased values.
for i =1:99                    
    if mq(i)

I run the above script and obtained the following results in the figures. The first figure shows a sinc function which is approximated with delta modulation technique, and the second figure shows a sinusoidal function which is approximated with delta modulation technique.

delta modulation encoder and decoder

Read More

Thursday, October 10, 2013

Shared Folder on Virtualbox on Linux Host

There are  a lot of people who use windows on virtualbox which is hosted by a linux distribution. For example, I installed virtualbox on Linux Mint 1.14 to setup Windows XP on it and use this for some software that I need for my education on Electrical & Electronics Engineering. Let's start with the most known problem.

Problem :

When we use virtualbox the most important problem is that how to share folders or directories with the host and any operating systems installed on virtualbox.

Solution: 

To solve this problem just follow the given instructions below:

1.  Open virtualbox and start any os that you installed on vb.
2.  Click 'Devices' tab which is seen in the menu bar of vb.
3.  Select ' Install Guest Additions'

If it asks to download click and proceed it.

4.  Totally close the operating system that you run on virtualbox.
5.  On Virtualbox software, click settings.
6.   You are going to see an option like 'Shared Folders' or 'Shared Directories'. Click on that.
7.   In that option click Add Shared Folder icon and enter its location and its name whatever you want. Make sure you checked read box before you click ok.

That's it, now you can share any folder between your host and operating system installed on virtualbox.(also called Guest Operating Systems)
Read More

Tuesday, August 27, 2013

Modeling a Whale Call with Matlab

I did my computer probation in a company called FIGES last year. In one of these days, my job was modeling a whale call of a blue whale. To do this firstly I did a long research, because I have needed
some equations to represent whale call.

According to my research:

Befitting the largest mammal on earth, the call of an adult blue whale is loud and low The
sound carries farther than any other animal sound, and can be detected over a thousand miles
away. The call has a distinct pattern. An a “trill” usually precedes a series of B “moans.”
There is little variation in the call among individual whales.

The B call is simpler and easier to analyze. It consists of a fundamental frequency around 16-
17 hertz and a series of harmonics(multiples) of the fundamental frequency. The amplitude of
the call is modulated to produce a loud moan followed by weaker moan.

• The envelope of the signal is treated as a decaying sine wave of the form A0*e^(-
Bt)*sin(2*pi*fm*t) where the amplitude A0 the decay rate B, and the modulating
frequency fm are all adjustable parameters.

• The signal itself is treated as a sum of harmonics sin(2*pi*n*f0*t) for n=0,1,2,3, ... .
The harmonics are assumed to be present for the entire duration of the call, even
though the higher harmonics appear and disappear in the middle of the call. (Simply
chopping off the higher harmonics introduces unwanted frequencies.)

• Because blue whale calls are so low, they are barely audible to humans. The time scale
in the data being modeled is compressed by a factor of 10 to raise the pitch and make
it more clearly audible. The model works with the same “x10” audible frequencies.

Using these informations I wrote the script in the following:


The Blue Whale B call model is shown in following figure. If you also wanna hear the voice, write down the codes into a matlab mfile and run it..


Read More

Wednesday, August 21, 2013

Firefox Babylon Add-on and More

Everyone knows Babylon dictionary, it is one of the most common dictionary that used in the world. A free babylon extension for firefox is available here. It works quite enough, the requirement is just clicking the word that you wanna search twice.

Babylon Dictionary

But missing part is that:

It doesn't save the word you search once. When you encounter a word that you have searched 10 days ago, you need to remember it or you need to search it again in a dictionary. 

SOLUTION:

I modified the babylon extension to resolve this deficiency. When you use the modified version, you will find the words you searched before in a file called mywords.html which is going to be found in your desktop. The mywords.html will looking as in the following picture. :)

Babylon - mywords.html


-->


Watch the following video tutorial to setup the babylon to do the work we want :)
[By the way, the blog you see in the video is belongs to my bro. http://make-possible.blogspot.com]


Download the modified version from here and mywords.html(right click and save it). Install the extension to the firefox and copy mywords.html into your desktop. Also you can use the following code to download mywords.html into your desktop:


Use it with fun :).

What I changed in Babylon to be able to do this? (saving every word we searched once)

The changes I have made are given in the following:

I add a new function called saveDataToFile into javascript file BabylonWordSearch.Results.js. The function is given below:


In if block that I given below, I send the answer that I get from babylon server by innerHTML  to the above function(saveDataToFile) .


To modify the extension yourself, you can find its source code from that post.

If you have any question or need some help, leave a comment below.

Read More

Monday, August 19, 2013

Loops in Matlab ( for in matlab, while matlab, for matlab)

There are two loops in matlab:
  • For loops 
  • While loops
For loops are used when the number of loop is certain whereas while loops are used when the condition is specified for a loop to terminate the code in it. 

You can see the usage form of for loops and while loops from given examples below:

Example 1: For loop


Example 2: While loop


For information in detail type in command window:

'help for' to get the following result:


or you can type doc for  to get reference page in help browser. I am not giving it here.

For while loops you can type:

'help while' to get information in detail like as given below:


or you can type 'doc while'  to get reference page in help browser. I am not giving it here.

If you have any question or need some help, leave a comment below.

Read More

Sunday, August 18, 2013

Flash for Linux

Hi guys, most of the linux distributions do not include flash as default installed software. Mint comes with flash but such as in ubuntu it is not preinstalled. So we have to install it. There are a few ways to install flash in linux:
1.   - open software center
        - enter 'adobe flashplugin
        -click install, that's it. (That is the first way to get linux flash)

2.   - open terminal by typing Ctrl+F2
        - write the following code:

to install adobe flash on ubuntu:


to install adobe flash on mint:


        - after this, if it ask Y or N type Y. Flash is installed, you can try it now. (That is the second way yo get linux flash)

 3.  - Open any website that requires flash, like youtube. It will ask you 'install missing plugins' press install or download. That should solve your problem about flash plugin. (That is the third way to get linux flash)

4.  -Open software center
       - type adobe flash into search box
       -click install, that's it. (that is the fourth way to get flash on linux)

If you have any question or need some help, leave a comment below.
Read More

Monday, August 12, 2013

Flashlight Android Application

Hi guys, today I wanna tell about one of my experince on android app development. A couple of days ago, I wrote a Flashlight android app using docs in developer.android.com, I checked the app in two different phones:

  • first in a Motorola phone: my app worked perfect, it did its job. (turning on and turning off flash of the camera)
  • second in a Samsung SIII Mini: my app didn't work, it didn't do its job. (when I touched the 'open flash' button, flash couldn't open.)

So, I started to search the problem. There were a lot of statements in websites like that: "FLASH_MODE_TORCH doesn't work on samsung". I have used this parameter in my app too. I didn't believe that, because when I request possible parameters from eclipse by pressing Cntrl+Enter there was only one parameter which can open the flash: FLASH_MODE_TORCH. So, I thought there must be a missing code which requires in samsung phones and not needs in phones like Motorola. I continued to search and found a nice solution which says use "camera.startPreview()" after setting parameters of the camera. I used this in my app and it worked in samsung phones too.

The picture of my app are given in the following, and you can download it from the link below pic. I wrote the app just for an example, so its gui is really bad and simple.


If you like this article, use the share buttons below to help my blog.
If you have any question or need some help, leave a comment below.

Read More

Saturday, August 10, 2013

Initial Arrangement Example in Matlab

Read More

A Traveling Wave by Making an Animation in MATLAB


After that I run it from the command window. I give three figures these are in different time to
see properly the wave is travelling.


Read More

How to add Categories to Blogger

Guys, today I will tell about categories in blogger. Unfortunately there is no any category widget in blogger. So we have to create it by ourselves. To do this We have two solutions.

First Solution: We can use labels with Links widget. Let me Explain with an example let’s say We want Matlab,Linux,Apple as our site’s categories. Then we need to add these names as labels to our posts. Then by clicking the labels in Labels widget we get their URLs. Copy these URLs one by one and add them to Links widget. In that way, we have categories in our blog. Have fun...

Second Solution: We can use laves with HTML/JAVASCRIPT widget. This time we will modify or create our Links widget by ourselves via writing html codes into HTML/JAVASCRIPT widget. The advantage of this solution is creating original categories with your requests. I hope it helps..
Read More

Wednesday, August 7, 2013

CPU Temperature Alarm System

Hi,  I want to write about Cpu Temperature Alarm System I have done by using advantages of linux kernel and linux shell. (I used bash shell in my script by the way.)

One of the biggest advantages of linux is to reach hardware components easily through kernel. The communication with hardware comes true as given in the following steps:

1. User writes his/her request as codes.
2. Shell converts these codes to be understand by kernel.
3. Kernel is a gui which can thought as an interface between hardware and shell. Kernel sends these requests to hardware components.

You can understand these simple steps and more from the following scheme:

I wrote down the following script which can control cpu temperature and if it is out of the condition I have determined, it plays an alarm.


The comments about the script are given in the following step by step:

1. I used acpi package to get temperature of cpu from sensors. Info: acpi - Shows battery status and other ACPI information
2. To edit the output of acpi -t command and get the cpu temperature only, I used gawk package. Info: gawk - pattern scanning and processing language
3. I wrote the cpu temperature with echo
4. I used an if-else-fi block for control part.
5. If it is lower than 90 C, I wrote down the message: "no dangere."
6. If it is higher than 90 C, I wrote down the message: "cpu is in dangere!" and play the alarm.

If you like this article, use the share buttons below to help my blog.
If you have any question or need some help, leave a comment below.

SPONSOR
-->
Read More

Monday, August 5, 2013

Tuning Processes

Introduction

In real-time systems some processes can cause huge problems, or slowing down the system performance. In such situations we need to tune the running processes. With tuning I mean stopping or killing the process. To be able to do this and to know when we need to know what processes currently runnig and when process start up? Especially, administrators need this. Because unexpected processes needs to be down or stop in systems such as servers, gaming boxes or other real-time systems. By saying processes I mean all applications and services in the system. So after that we need to view the running processes, let's look at that.

Viewing Running Processes

The only thing that consume your system resources are running processes. If your computer seems to be running slower than normal, then it is probably because of some misbehaving running processes or some running processes that use more than resources our system have.

There a couple of ways to view running processes, these are:

     1. top command: this command lists all running processes by ordering them cpu usage and memory usages.
     2. ps -ef command: this command lists every running processes in full detail.
     3. The Graphical System Monitor(SystemAdministration►System Monitor): also enables you to list all the running processes.

Sample listing of running processes from ps-ef command:


Sample listing of running processes from top command:


Killing Processes

To kill a process, we can use PID(process id). As you can see from outputs of two commands above we have process ids for each running process. For example, to kill PID 217 we type kill 217. This command will kill the process have PID of 217. To suspend (stop) a running process use kill -STOP PID, to continue to a suspended process use kill -CONT PID.
Example: As an example run an application, find its PID using above commands, and first kill, then suspend and later allow to continue the process.

Finally, we finished the tuning process techniques in linux. I hope it will help you..

If you have any question or need some help about tuning process , leave a comment below.


Read More

Sunday, August 4, 2013

Format USB(flash drive) From Terminal

It's easy to format usb drives from terminal. But, you need to first find what's your usf file system. To find this we can use df command.

df: report file system disk space usage 

Also, to be able to format the usb, usb shouldn't be mount, if it is we are going to unmount it.
Now, just to be clear I am going to format my own usb step by step, at required steps I will give the terminal screenshots.

Steps I have down:

      1. type df command into terminal

terminal output:


     2. Plug in usb (flash drive)
     3. type df command into terminal

termainal output:


As you can see we have a new entry at the last row, which is should be my usb. It's file system is given as /dev/sdb at terminal output of df command.

    4.  to unmount the flash drive type: sudo umount /dev/sdb
    5.  to format the usb as fat type: sudo mkfs.vfat -I /dev/sdb

You can see the terminal executions of step 4 and 5 below:  


That's it we are done, I hope it helps..

If you have any question or need some help about format usb drives, leave a comment below.

Read More

Saturday, August 3, 2013

System Logs in Linux

Introduction to syslogd
syslog daemon responsible from syslog. This structure collects all messages from running programs to the logs. It categorizes all of messages according to its types and priority, and presents to us. This is very useful for error debugging. We can use this messages to find the actual problem if we have any one at any time. Actually I used that in my previous post. You may wanna see it.

Reading Logs

Now, let's look at how we can read logs. FHS determines the location of logs as /var/log. We can use tail command to read last ten messages like that:

cd /var/log
tail messages # note: if you don't see anything or get no file error type: tail syslog

output of this command:


As you can see from last ten messages, at 10:42:24 I disconnected the modem I cut the internet, which is a message from network manager and it have saved into syslog.

Following Logs from tail

A system administrator would use tail -f command to follow log messages like that:
tail -f /var/log/messages or tail -f /var/log/syslog

Because by using -f parameter with tail command, we can read new messages from running programs at right now. This is very handful for debugging. Also, almost all system manager executes that command in another terminal all the time, to see the messages coming through when the programs are running.

Let's see how it works: I entered the command to read syslog continuously, and I disabled eth0 in another terminal, the terminal views are given below:

terminal 1:


terminal 2:


As you can see from terminal 2, message says eth1 disabled when we type and entered ifconfig eth1 down into other terminal. It works :).

If you have any question or need some help about system logs in linux, leave a comment below.

Read More

Friday, August 2, 2013

Gimp The GNU Image Manipulation Program

Gimp is an alternative software to Photoshop. Most users of linux use Gimp instead of Photoshop. Last version of Gimp is 2.8. I use it myself in my ubuntu 11.10 Oneiric Ocelot and Linux Mint 1.14 Nadia.

I recommend it to you if you are using a distiribution of linux. If you are using Windows or other platforms, I think Photoshop is better than Gimp. As we know it is more common than Gimp.

      Features:
  • Customizable Interface 
  • Photo Enhancement
  • Digital Retouching
  • Hardware Support
  • File Formats (jpeg, gif, png, tiff, psd.)
  • Supported platforms
    • GNU/Linux (i386, PPC)
    • Microsoft Windows (XP, Vista)
    • Mac OS X
    • Sun OpenSolaris
    • FreeBSD
      Last Version: Gimp 2.8

To download Gimp you can use the following link which is from its official website:
Also you can download some documentation from:

     Some Screenshots:  You can see in original dimensions by clicking the pics below.

Gimp Screenshot 1
Gimp Screenshot 2
Gimp Screenshot 3
Read More

Wednesday, July 31, 2013

Wireless networks are not being seen by network manager

Summary: In this article I am going to show you the solution of the problem: wireless networks are not being seen by network manager even if wireless card drivers are installed.

Yesterday, I reinstalled Linux 1.14 Nadia in my pc. After that I installed my wireless card driver which is Broadcom Corporation BCM4312. I learned its name and version from lspci command. lspci is a command on Unix-like operating systems that prints detailed information about all PCI buses and devices in the system. After that I installed the driver using method 1 which is I explained earlier in that post.

Everything was ok,  I used the internet connection for hours, but after that I encountered a new problem. The wireless was working well but it couldn't see any wireless connections. I thought, I can use error debugging techniques in linux to find the actual problem.

I am going to explain Error debugging techniques in linux at an article in the next days. 

So, I opened a terminal and I typed in:

  
syslog is a .txt file which includes all errors, messages and notifications coming from apps, softwares etc. And the most beautiful property is we can view at  this moment what is going on about an application or software. Once you typed in above command it will show the new errors or messages too. 
When I typed in that command , and view messages, I clicked the icon at the right bottom of desktop and then >>Connect to Hidden Wireless Network , I choosed an past connection which I used before. And click connect. My purpose was to interact with network manager and see if it has a problem if it is see in the syslog. When I did this I saw an input to syslog which is shown below:


As you see in the last rows, it is saying eth1 is not active.(inactive) We found the actual problem!. Now we are going to solve it.. I typed the following commands into terminal to stop and restart again eth1 interface.


This solved my problem. I hope it solves your problem too..

If you have any question or need some help, leave a comment below.
Read More

Sunday, July 28, 2013

Dice Simulation with C or C++

I wanted to model the dice simulation using C or C++. You can see the codes in the following.


Read More

C veya C++ ile Zar Atma Simulasyonu

Bu programımda zar atmayı C ile modellemek istedim. Program kodlarını aşağıda görebilirsiniz.


Read More

Thursday, July 25, 2013

CPU Sıcaklık Alarmı Sistemi


Merhabalar, bu yazımda linux kernel ve linux shell in verdiği harika avantajlardan faydalanarak yaptığım CPU Sıcaklık Alarmı Sistemini anlatmak istedim.

Linux un bize sağladığı en büyük avantajlardan biri kolaylıkla hardware bileşenlerine ulaşabilmemizdir. Hardware ile iletişim şu şekilde gerçekleşir :

1. Kullanıcı isteklerini kodlar halinde yazar.
2. Shell bu kodları linux kernel in anlayabileceği dile çevirir.
3. Kernel ise hardware ile shell arasındaki iletişimi sağlayan bir nevi arayüz diyebileceğimiz bir sistemdir. Kernel bu istekleri hardware bileşenlerine iletir.

Bu basit adımları ve daha fazlasını şema olarak aşağıdaki resimden anlayabilirsiniz..

Resimden görüldüğü gibi linuxtaki uygulamalarda çalışırken önce shell ve user ile iletişime geçerler. Daha sonra shell uygulamanın isteklerini kernel e anladığı dilde iletir. Kernel de bu istekleri hardware bileşenlerine iletir. 

Düşündüm ki madem böyle o zaman:

1. CPU nun sıcaklığı için önce cpu nun sıcaklığını ölçen bir hardware bileşenimiz olan sensörlere ulaşmam lazım. Linux ta bu işi yapan basit komut : 'acpi -t' komutudur.
2. Sensors komutu şu şekilde bir çıktı verecektir: 
Thermal 0: ok, 46.0 degrees C
Buradaki 46.0 değeri cpu nun santigrat cinsinden sıcaklığıdır. 
3. Bu cevapta benim ihtiyacım olan sadece 46.0 değeridir. Bu değeri bu satırdan çekmek için ise şu komutu kullandım: awk '{print $4}'.. Herhangi bir linux dağıtımı kullanıyorsunuz, illa ki awk ı duymuşsunuzdur. Awk dilleri ya da yazıları scan ve process etme pattern idir. Benim bu adımda yaptığım gibi.( 46.0 değerini şu cevaptan çektik>>Thermal 0: ok, 46.0 degrees C)
4. Daha sonraki adımda kendi belirleyeceğim bir değerle cpu sıcaklığını karşılaştırıp, bir alarm zili çaldırmak istedim. (Eğer cpu sıcaklığı benim belirlediğim değerden yüksek ise.). Bu basit karar verme bloku için tabiki 'if else fi ' blokları yardımımıza koşacaktır. 
5. Dördüncü adımda bir alarm zili çaldırmak istediğimi söylemiştim. Bunu sağlamak için sox paketini kullandım. Sox paketindeki play komutu .wav vb. dosyaları çalıştırmamızı sağlar.

Anlattığım bu adımları gerçekleştirdiğim scripti aşağıda görebilirsiniz. Script doğru bir şekilde çalışıyor..


 Herhangi bir sorunuz ya da yardıma ihtiyacınız varsa, aşağıya yorum bırakabilirsiniz.
 Yazıyı beğendiyseniz,  beğen butonlarını kullanarak bloguma destek verebilirsiniz.


Read More

Tuesday, July 23, 2013

Dictionary With Python

Python is a fast programming language as compared to other programming languages such as C, C++, java.. Also it is have a dictionary class which is very useful to create databases. So I thought writing a dictionary app with python would be efficient, fast and easy to build up.

If you don't have python installed in your system, you can see the installation instructions from my an older post installing python. The required steps I have determined are in the following.

Required Steps:
  1. Create the database.
  2. Take an input from the user.
  3. Search the word user entered in the database.
  4. If database has it, write down the corresponding meaning of the word.

This four steps will be enough to make a simple dictionary, but I want to add a new feature which is 'Adding New Word' feature. I mean the user can be able to add new words if the database has not it. By doing this the user will be able to grow up database of the dictionary. In other words, the user will generate his/her own dictionary. So additional steps are give in the following.

Additional Steps:
    1. If database hasn't it, ask to user 'is he/she want to add the new word'.
    2. If yes, take the new word and its meaning from user.
    3. Add it to the database.
    4. Close the Dictionary.
By using to-do list above, I wrote the following script in python. I named it as Mpdictionary. The code is given below:

The Code:
----------------------------------------------------------------------------------------------------------------------------------
----------------------------------------------------------------------------------------------------------------------------------

Working windows:


If you have any question or need some help, leave a comment below.

Read More

Monday, July 22, 2013

Install Android SDK on Eclipse On Linux Distributions

To start developing Android apps we need to first choose an IDE platform or environment. I recommend Eclipse. It is really good and efficient to develop android apps. I will give the step by step installation of Eclipse and set up it to develop android apps.

Reqired Steps:

1. Open a terminal by typing Ctrl+F2
2. Type 'sudo apt-get install eclipse' enter, enter your password , this will install Eclipse platform.
3.  After installation open Eclipse from installed apps. When it is opening it will ask you workspace folder which is contains the application folders, choose or create as you want.

Now it is time to get Android SDK:

4. There are versions for linux distributions get the latest and convenient version for your system from: http://developer.android.com/sdk/index.html
The Android SDK is a compressed folder. Download and extract the contents of this
file to a convenient place on your computer. You should install the SDK where you usually put your
development tools. Open SDK file you will see a file as tools, in that file click android script and click run to run it. This will install Android SDK.

Both Eclipse and the Android SDK are installed. It's time to install the Eclipse plug-in
to take advantage of the Eclipse environment.

Obtaining and Installing the Eclipse plug-in

1. Run the "Find and Install" feature in Eclipse, found under the Help >Software Updates menu.
2. Select the Search for new features to install option.
3. Select New Remote Site. Give this site a name, such as "Android Developer Tools," for example. Use the following URL in the dialog:
https://dl-ssl.google.com/android/eclipse. Please note the HTTPS in the URL. This is a secure download.

4. A new entry is added to the list and is checked by default. Click Finish. The search results display the Android Developer Tools. Select the Developer Tools and click Next.
5. After reviewing and accepting the license agreement, click Next. Note that the license agreement includes a special requirement for use of the Google Maps API.
6. Review and accept the installation location, then click Finish.

The plug-in is now downloaded and installed. The plug-in is not signed (at the time
of writing), so proceed at your own comfort level by clicking on Install All, then
restart Eclipse.

If you have any question, or need some help, leave a comment below.
Read More

Sunday, July 21, 2013

Linux Mint 1.14 Nadia Wireless Problem

I installed Linux Mint 1.14 Nadia a few months ago. Wireless  wasn't working because of the driver was not installed. In some linux mint distributions you can have this problem, nadia is one of them.
Also, in some ubuntu distributions you can have the wireless problem too.
To solve this problem you need to install wireless driver and reboot your computer or restart network services. To doing this there is several methods. Methods are given as follows:

Method 1:

1. Open a terminal by typing ctrl+F2
2. Type lspci and press enter, to specify your chipset, in my pc it is Broadcom
3. Open Software Manager, type 'your chipset' into search box
4. Install wireless driver
5. type sudo service network-manager restart into terminal to restart your network service Problem is solved have fun with your wireless..

-->

Method 2:

1. Open Additional Drivers
2. Select your chipset driver
3. Click apply changes
4. open terminal
5. type 'sudo service network-manager restart' to restart your network service
Problem is solved have fun..

Note: Both of methods are tested, working correctly.

If you have any guestion, or need some help, leave a comment below. 
Read More